Tuesday, December 29, 2009

Tea Latte

Why go out to a coffee shop for a tea latte when you can make one at home at a fraction of the price? I think the best part of making these at home yourself is you can experiment with your favorite teas and even make your own simple syrups to use!

If you've got an espresso machine, you can use that to make this drink a bit more "authentic" with steamed milk and tea shots.

Tea Latte

Ingredients

  • 6-8oz brewed tea
  • 2-4oz hot milk
  • Vanilla syrup (to taste)

Method

With espresso machine:

  1. If using an espresso machine, steam the milk and syrup and set aside.
  2. Pack a scoop of tea leaves as you would ground coffee and pull your shot(s).
  3. Pour the tea shots into the milk and serve.

Without espresso machine:

  1. Combine all hot ingredients in a mug and serve.

Friday, December 25, 2009

Simple Cinnamon Roll Filling

I was watching Everyday Italian the other day and Giada was making hazelnut cinnamon rolls. Now, I am not a fan of hazelnut but got to thinking how good walnuts might be in its place. Next thing you know, I'm making cinnamon rolls with apples, cherries, and walnuts.

One of the best cinnamon rolls I've ever had, if not the best, were those a coworker brought in at work. Let me tell you, they were so good I think I ate three of them (and they were HUGE)! There's no way I'll ever get that recipe and I'd be lucky to stumble across anything as good.

If you're not into making bread dough, try store bought dough as Giada recommends. Otherwise, any sweet dough will do. Roll out your dough into rectangles.

Simple Cinnamon Roll Filling

Ingredients

  • 1/2 cup butter, melted
  • 1/2 cup brown sugar, packed
  • 1/2 cup white sugar
  • 2 tsp cinnamon
  • 2 tsp nutmeg
  • 1/8 tsp ground cloves
  • Dash vanilla extract
Optional mix-ins:
  • 1 Granny Smith apple, peeled, cored, and diced
  • 1/4 C dried cherries or cranberries, diced
  • 1/4 C walnuts, chopped

Method

  1. Mix ingredients thoroughly in a bowl. Add optional mix-ins, if desired.
  2. Spread evenly onto dough, then roll, cut, and bake as normal.

Thursday, December 24, 2009

Stollen

When it comes to desserts, David Lebovitz is someone I trust unconditionally. His blog is good, his information great, and recipes phenomenal. Last time I was looking around his site, I saw his recipe for stollen and just had to make it. And hey, 'tis the season, as they say. Mine turned out deliciously and look surprisingly just like his.

I looked around for other stollen recipes but they all seemed to use candied fruits (more like a fruitcake) and that just wasn't appealing. Then I was going to blend recipes, but they used varying ingredient amounts with different yields. In the end, I basically followed his recipe, so I'll just link it here. Of the slight changes I made:
  • Substitute Grand Marnier for the rum to soak the fruits
  • Omit the candied ginger (due to its extreme price) and citrus peel (due to its apparant unavailability at grocery stores around here)
My only complain is not knowing when the bread is done cooking. Sure, he suggests using a digital thermometer, but come on, it's bread! Mine ended up being slightly overcooked I think, but delicious none the less. The recipe makes four loaves which makes it great for gift giving!

Sunday, December 13, 2009

Bagels

I had my first cheese bagel the other week and was blown away by how delicious it was. I decided I needed to make my own, as spending $1.50 for an impulse snack seems unnecessary, especially since bagels are so easy!

Here is my favorite bagel recipe: http://www.tammysrecipes.com/homemade_bagels

I've made this recipe several times, last time I believe was around Mother's Day for brunch. They are really easy to make, especially if you have experience working with yeast, as this can sometimes be tricky.

To make these "cheese bagels", simply sprinkle with shredded cheddar after brushing with egg, and bake for the specified time.
It has been a long time since my last posting and a lot has happened since. Two books I've read recently have really changed my perspective on food--Food, Inc and Animal, Vegetable, Miracle. I definitely recommend both books, but they really make you think.

Ideally, I'd love to be able to grow and prepare more of my food, but that's not really realistic. I have, however, been enjoying making my own applesauces, chai tea, and bagels in recent weeks, and right now, that's about as good as I can do.

One recipe I did learn from Animal, Vegetable, Miracle is for yogurt cheese. It's a bit like a soft cream cheese. Simple drain yogurt over several layers of cheesecloth overnight. I like to salt mine as well to bring out the flavor. Spread over bagels, English muffins, and so on as you would cream cheese. It's tangy, easy to make, and a fresh alternative to cream cheese.

Tuesday, October 6, 2009

whatever, martha

I've got a bit of Martha Stewart in me, in the best way possible, I like to think. I bought some oilcloth with the intention of sewing a lunch bag and some small zip bags as a kind of reusable/washable ziploc (they do sell plastic bag drying racks...). My first "project" was this lunch tote perfectly sized for three new containers. I actually have a modification or two for this bag style and ideas for a few new styles. I like this bag because it holds all my stuff but also because I can easily rinse it out if anything leaks!


I have also been on the lookout for reusable shopping bag patterns and projects online. I'm hoping to sew up some bags using old t-shirts and clothing but nothing has struck my fancy quite yet. Many tutorials simply have you cut off the sleeves, sew up the bottom, and maybe modify the neck a bit to accommodate larger items, but I guess I'd like something more...streamlined(?) than that. I did end up making this market bag, which I highly recommend as a quick project.

And in true Martha style, I spent a few hours of my weekend making chicken stock. One tip I learned from this book: your stock should be at a very low simmer--anything stronger will emulsify the fat into the stock which you don't want.

Wednesday, September 30, 2009

Capturing Summer

It's something I've been wondering for a while now, well, at least since the first signs of fall a couple weeks ago--how can I make summer last as long as possible? Is it through farmer's market produce? Fresh brewed sun tea? The perfect cheeseburger?


I tried these methods, but sadly it just isn't working for me. I suppose the incoming rain and cooling temperatures are just going to require a change in mindset. It's the season for soups, stews, perhaps endless cookies and...pumpkin lattes?

I ran across a recipe for these [pumpkin spice lattes] a few days back and can't get enough! I've never tried the "authentic" Starbucks one, but its like drinking a mild pumpkin pie, and super easy to make with a bit of canned pumpkin. An espresso machine whips this up in a hurry (just steam the ingredients), otherwise the method listed on the site works just as well.

Tuesday, September 22, 2009

broiled tomato and eggplant

I made broiled tomatoes to go with breakfast the other day; a quick, simple, and perhaps non-traditional breakfast food that comes together VERY quickly. It's also a great way to use up summer tomatoes. Depending on your individual preference, you may wish to broil the tomatoes for a few minutes for a cooked tomato texture.

Broiled Tomatoes

Ripe tomatoes, cored and halved
Olive oil
Salt and pepper
  1. Set the oven to broil, 500 degrees.
  2. Place the tomatoes cut side up on a baking sheet.
  3. Drizzle with olive oil and season liberally with salt and pepper.
  4. Broil tomatoes for 1 minute.


I am by no means an expert on Japanese cuisine. I do know they have a delicious miso eggplant side dish, though the Japanese eggplant is often cooked until soft (and slightly mushy). Until I find a real recipe for this dish, I'll continue to play around with different combinations for the miso sauce. This is my latest version; I like the combination of sweet and salty:

Broiled Japanese Eggplant

Japanese eggplant, in 1/2 inch lengthwise slices
1 tbsp white miso
1 tbsp mirin
1/2 tsp honey
  1. Set the oven to broil, 500 degrees.
  2. In a small bowl, combine the miso, mirin, and honey and stir until combined.
  3. Place eggplant slices onto a baking sheet, then brush the miso sauce over each eggplant slice.
  4. Broil for 2-3 minutes, until slightly browned. At this point, the eggplant should still have a bit of firmness to it.

Monday, September 21, 2009

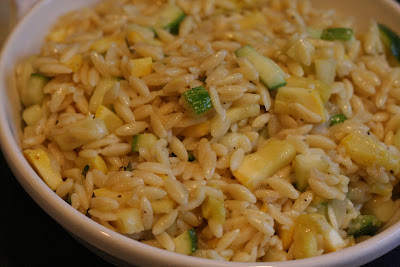
Farmer's Market Orzo Salad

I used fresh from the garden vegetables to throw together this pasta salad: zucchini and yellow squash. These plants yield huge quantities so it's always good to have a few more recipes in your summertime arsenal. I love this salad for its fresh color and all the cheese; I think its a great way to spice up some summer vegetables that become a bit bland and boring by the end of the summer.


Farmer's Market Orzo Salad

Ingredients

  • 1/2 box orzo pasta (about 4 servings)
  • 2 tbsp olive oil
  • 1 yellow onion, chopped
  • 1 clove garlic, pressed
  • 1 small zucchini, cubed
  • 1 yellow squash, cubed
  • 3-5 sprigs of thyme leaves
  • 1 1/2 cups Parmesan cheese, grated

Method

  1. In a large saucepan, cook the orzo in boiling water for about 9 minutes until cooked. Drain and set aside.
  2. Using the same pan, heat the oil over medium low. Add the onion and garlic, stirring occasionally until caramelized, about 20 minutes. Season with salt and pepper to taste.
  3. Meanwhile, prepare the vegetables and grate the cheese. When onions are ready, add the vegetables and thyme and stir, sauteing for three minutes, until the squash and zucchini are slightly cooked but still firm.
  4. Add the cheese, then the pasta, and stir until combined. Season once more with salt and pepper to taste.
  5. Serve warm or at room temperature.

Monday, August 31, 2009

Sparkling Jelly Dessert

Another day, another Japanese recipe. Jelly seems to be popular in Japan, and by jelly, I mean gelatinous liquid. From coffee jelly in espresso drinks and desserts to tomato jelly in pasta, nothing is off limits. I think jelly is cool and refreshing, perfect for summer. This recipe is from 大人のお菓子, which I will try to call "Sophisticated Snacks" or something like that going forward. The original recipe uses sparkling wine, but I tried making it with sparkling juice as well and it was just as tasty. Use whatever sparkling beverage strikes your fancy; for sweetened beverages, like soda, omit the sugar.


Sparkling Jelly

5g gelatin, or about 1 packet

2 tbsp water (to soften gelatin)
50mL water

30g sugar

250mL sparkling wine, or other sparkling beverage

  1. In a small bowl, combine the gelatin and 2 tbsp water. Set aside.
  2. Using the microwave or stovetop, combine the sugar (if using) and water and boil until the sugar is dissolved. Transfer liquid into a bowl; this bowl will later be used to chill the gelatin until ready to serve.
  3. Add the gelatin to the hot water, stirring to combine. Gently pour in the sparkling wine.
  4. Set aside 50mL of this mixture at room temperature for later. Cover the surface of the remaining liquid with plastic wrap. Place into an ice water bath and refrigerate.
  5. Before serving, whisk the room temperature liquid until foamy. Spoon the chilled jelly into small serving glasses and top with a spoonful of foamed gelatin.
If you run out of foamed jelly, you can take a bit of your chilled gelatin, heat it up to get it back to liquid state, and then froth away.

Thursday, August 27, 2009

Japanese Style Cheesecake

This recipe comes from a Japanese cookbook, 大人のお菓子. If you've ever had Japanese desserts, they are complete different from anything else--light, perfectly proportioned, not too sweet, and absolutely delicious!

After five failed attempts to make this cheesecake properly, cheesecake #6 turned out perfectly. Tenacity pays off, my friends.

Japanese Style Cheesecake

*This recipe is yields one 6" round cheesecake. If you use a larger pan, you may need to double or even triple the crust recipe to accommodate.

Ingredients

Crust:
  • 50g graham cracker, crushed to bits (1/4 C)
  • 20g butter, melted (1.5 tbsp)
Filling:
  • 200g cream cheese, softened (7 oz)
  • 90g creme fraiche or sour cream (1/2 C)
  • 80g sugar (1/3 C)
  • 1 egg
  • 2 tbsp cream
  • 10g cake flour (2 1/4 tsp)
  • 1" vanilla bean, split and seeds removed (or 2 tsp vanilla extract)

Method

To make the crust:
  1. Crush the graham crackers into pieces in a plastic bag.
  2. Combine and mix with butter until well blended. Press into the bottom of the baking dish to form the crust.
  3. Bake in a 350 degree oven for 10 minutes while you prepare the filling.
To make the filling:
  1. In a separate bowl, whisk the egg white and remaining sugar until stiff peaks form (this may take a few minutes with an electric mixer, be warned).
  2. Gently fold 1/3 of the cream cheese mixture into the egg whites until just blended. Fold in remaining cream cheese.
To finish the cheesecake:
  1. Carefully pour the cream cheese filling over the prepared crust, smoothing the top.
  2. Place cheesecake on the middle rack of a preheated, 340 degree oven. On the lower rack, place a baking dish filled with a few inches of water to provide moisture.
  3. Bake for about 40 minutes at 340 degrees, then reduce the heat to 320 and bake for an additional 20 minutes. At this point, the cheesecake should be cracked on top and slightly "jiggly".
  4. Remove cheesecake and allow to cool on a rack.

The cake is perfect by itself, but add a spoonful of berry jam or sauce (try blueberry lemon or strawberry black pepper!) for a real treat :)

Wednesday, August 26, 2009

the joys of the scale

I've become a bit...unstoppable, we'll say, since recently purchasing a kitchen scale. Before, I was a bit annoyed when recipes were in grams. Now, I just roll with it and dare I say prefer this kind of measuring. No bothering with measuring cups and spoons! After buying an absolutely gorgeous glass top kitchen scale for a wedding gift, I had to get in on the action and bought a black and stainless steel one.

I am most excited about this purchase because it allows me to more easily cook from my Japanese snack/sweets cookbook, 大人のお菓子, literally "adult sweets". The book contains sophisticated cookies, cakes, and desserts and I am having great fun translating and trying out the recipes (no need to sloppily convert grams to cups with my new scale). I will admit, I have one huge translation issue, resulting in 5 less than perfect items. Clearly I don't give up easily.

Monday, August 17, 2009

Rosewater-White Chocolate Flavored Coffee

Really, this is just a slightly jazzed up cup of coffee. I am not generally a coffee fan, though I will drink sweetened espresso drinks on occasion. Somehow, paying $4 for a cup of milk with coffee just doesn't appeal to me. I came up with the idea for a drink like this; who doesn't have a pot of coffee in their kitchen at home or at the office? Adding milk/cream and syrup makes that plain brown water into something special.

I like the idea of rosewater because it adds a nice floral scent and delicate flavor that lingers. This would also be fantastic as a white chocolate mocha, just substitute the white chocolate simple syrup for a white chocolate syrup. Both are available at standard grocery stores.

Rosewater-White Chocolate Flavored Coffee

Ingredients

  • 1 scoop ground coffee
  • 8 oz boiling water
  • 4 oz milk, hot
  • 1 oz white chocolate flavored simple syrup
  • 1/2 oz rosewater

Method

  1. Prepare coffee in a french press, brewing for 1 minute.
  2. Combine all liquids into a mug and serve.

Wednesday, August 5, 2009

New York Cheesecake (ニューヨークチーズケーキ)

I'm getting adventurous...Inspired by a recent trip to Japan, I perused the Kinokuniya bookstore for Japanese cookbooks before settling on one for desserts and snacks. 大人のお菓子 translates to "adult sweets" and is filled with a variety of recipes, all of which look pretty simple. This is before translation of Japanese to English and measurement conversion. I've tackled recipe conversion once the other way around; it turned out okay, not perfect, but okay.

I've settled on ニューヨークチーズケーキ, "New York Cheesecake", a classic. The proof is in the pudding though, so we'll just have to wait and see what happens.

See the cheesecake recipe here.

Tuesday, August 4, 2009

Blueberry, Lemon, and Chili Pepper Jam

I'm not going to lie...I went back to pick even more blueberries--for this recipe! It just didn't seem right to dig into my freezer stash to make this.

I made a blueberry, lemon, chili pepper jam the other day and had to have more. I was expecting it to be spicy, with the jalapeno and habenero peppers, but the peppers just add a bit of heat (not spiciness). It's really good! I think it would be good with cornbread or biscuits, you know, served up in a bowl...

Blueberry, Lemon, Chili Pepper Jam

Ingredients

  • 3 pints blueberries
  • 2 1/4 cups demerara sugar
  • 1 cinnamon stick, toasted
  • 1 lemon rind, sliced into thin strips
  • 1 tbsp jalapeno, minced
  • 1/2 tsp habenero, minced
  • 1 tsp kosher salt
  • 2 tbsp cilantro, sliced

Method

  1. If using, prepare the canning pot, jars, lids, bands, etc.
  2. In a large pot, add the blueberries and sugar; mash berries and blend well with the sugar. Add the cinnamon stick, lemon zest, peppers, and salt.
  3. Bring to a boil, then reduce heat to simmer for 30 minutes, stirring often. Jam should thicken slightly.
  4. Stir in the cilantro and cook for about 1 minute. Remove cinnamon stick.
  5. Fill into jars or container. If canning, process for 10 minutes, then sit at room temperature for 24 hours; refrigerate any jars that do not seal. Otherwise, refrigerate until ready for use.

Monday, August 3, 2009

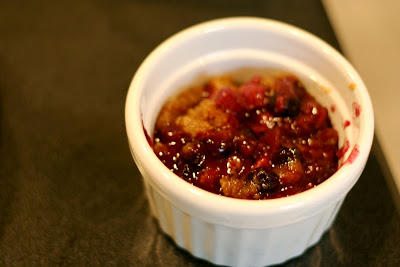
Blueberry Rhubarb Crisp

Continuing the blueberry theme...this is the best blueberry dessert I have EVER eaten. I'm already freezing blueberries and rhubarb so I can make this all year. The best part is the simplicity of it; you mix up some crumble topping, toss the fruit with some standard pantry items, throw into the pan, and bake!


Blueberry Rhubarb Crisp
Bob's Red Mill Baking Book


Topping

¼ cup unbleached white flour

¼ cup soy flour
½ cup brown sugar, packed
½ tsp ground cinnamon

½ tsp ground nutmeg
5 tbsp butter, chilled and diced


Filling

1/3 cup sugar

¼ tsp ground cinnamon
2 tbsp whole wheat flour

2 cups rhubarb, diced into ½ inch pieces

2 cups blueberries
  1. Preheat the oven to 375 degrees and grease a 9x9 inch baking dish.
  2. For the topping, combine the flours, brown sugar, cinnamon, and nutmeg in a small bowl. Add the butter and work it into the flour mixture until crumbly. Refrigerate while making the filling.
  3. In a small bowl, stir together the sugar, cinnamon, and flour. Add the rhubarb and blueberries, tossing well.
  4. Spread the mixture in a prepared baking dish. Sprinkle topping over the fruit and bake for 35 to 40 minutes, until the topping is brown and the fruit is bubbling. Serve warm.

Sunday, August 2, 2009

Blueberry Lemon Sauce

This recipe is so easy, I'm typing it up as the stuff is processing.

For more information about canning, check out this site by the National Center for Home Food Preservation: http://www.uga.edu/nchfp/how/general.html

Blueberry Lemon Sauce

Ingredients

  • 4 pints blueberries, washed
  • 1 lemon, zested and juiced
  • 1 cup sugar
  • 1/2 cup orange juice

Canning supplies: canning pot, jars, lids, bands, etc.

Method

  1. Prepare jars and lids per manufacturer instructions. Prepare canning pot with water to full boil, ready to process jars.
  2. In a large pot, combine the lemon juice and zest, sugar, orange juice, and blueberries. Bring to a boil, stirring occasionally.
  3. Lower the heat and simmer blueberry mixture for 2 minutes, stirring to completely dissolve the sugar.
  4. Ladle sauce into jars, leaving 1/4in head space. Wipe rim clean, attach lid and band.
  5. Process in canning pot for 15 minutes./li>
  6. Remove jars and allow to cool on a rack. At this point, the jars make a cool popping sound as they are sealing. Allow jars to sit out for 24 hours. Place any jars that do not seal into the fridge.

If you don't care to can you can refrigerate for up to 3 months.

Makes about 3 pints..

This sauce is ridiculously good. It reminds me of a nice blueberry syrup, perfect for pancakes, french toast, or crepes.

U-pick? U-betcha!

It's now an unofficial annual tradition--blueberry picking with my aunt. Last year we went out one morning to pick and walked away with 16 pounds! How did that happen? Well, when you're chatting away and picking big, plump berries, it's pretty easy it seems. This year, we were extra careful to unknowingly pick 20 pounds; we ended up picking about 14 pounds this time.


We went to Lolich's Blueberry Farm where u-pick blueberries were $1.50 per pound. They've got a huge field of blueberries, it seemed like different varieties were mixed in, so tasting each blueberry bush to find your preferred flavor is a must.


Check them out:

Lolich's Blueberry Farm
18407 SW Scholls Ferry Road
Beaverton, OR 97007
503.352.4448
http://www.lolichblueberryfarm.com/

Sunday, July 26, 2009

freezer mania

Ahh, the joys of the freezer. Tuck away those extra bits of dough (scones, cookies, bread), homemade jams, fresh picked berries, and extra cakes and cookies for a rainy day.

With the recent berry season, I have gone a bit wild making jams (freezer and traditional) and freezing all those delicious berries. Canning seems like a daunting process, so it's best to do a big batch of stuff at a time with another person or two to help out. For the majority of my jam making, I used the standard Certo recipes. I like the low sugar stuff if I can use it, otherwise I tend to add extra berries to lower the sugar to berry ratio. For strawberry jam, try using balsamic vinegar in place of the lemon juice for a FANTASTIC strawberry balsamic jam full of depth and wonderful strawberry flavor. Trust me. I originally saw it here: http://achowlife.blogspot.com/2009/05/canning-is-cool.html

Just this weekend, I pulled out a couple of chocolate dessert items--a chocolate chip pound cake and chocolate drop cookies. I made this chocolate chip pound cake recipe earlier this year and froze the second loaf, wrapped twice in foil, once in a freezer wrap, and then into a freezer bag (worried about freezer burn much?). The loaf cake recipe also comes with a chocolate sauce to dip the cake in or drizzle over. Absolutely delicious.

Sunday, May 24, 2009

Smoked Salmon and Apple Carpaccio

What to do with leftover smoked salmon or lox?

I saw this recipe for Smoked Salmon and Apple Carpaccio on Giada at Home.

It came together fairly quickly; with nothing to cook, it was as quick as slicing an apple and arranging everything on the plate. I chose to not serve mine on bread (Giada uses olive bread). I thought the flavors were interesting, not sure if I'd make it again though.

Friday, May 15, 2009

Mother's Day--in [food] photos

Blueberry Pancakes with Orange Butter (orange butter not pictured)


Homemade Bagels and Lox


Coconut Shrimp Stew


Fresh fruit with rose scented whipped cream

Saturday, April 4, 2009

Chocolate Covered Bacon

Take a good look, for this is what chocolate covered bacon looks like! I'm not sure this rivals the bacon cookies I made, but it is kinda tasty. Makes me want to try the Vosges Bacon Bar (I saw it today at Whole Foods and was tempted...fortunately the price wasn't marked, otherwise I just might have bought one!).

This "recipe" isn't so stellar, so I won't post anything official. To try it yourself, cook up some bacon to your desired doneness; I prefer mine crispy. Meanwhile, melt some chocolate. When the bacon is cooked, spoon the chocolate on the bacon pieces. Chill until serving.

Wednesday, April 1, 2009

mojto time!

I got a taste for mojitos while in Japan. I'm not really a big mint fan, so it really doesn't make a lot of sense. When I make mine at home, I tend to cut way back on the mint, using only a sprig or two. This week, I tried two "new" types: blueberry and pineapple. Yummy!

Some mojito fans may call me uncivilized for messing with this drink...but I can't help it! I like what I like. Besides pineapple and blueberry (pineapple was my favorite), I think strawberry or raspberry would be delicious.

Fruity Mojito

Ingredients

  • 1-4 mint leaves
  • 2 tsp sugar
  • Juice of 1/2 a lime
  • 1/4 C fruit, pureed
  • 2 oz light rum
  • Club soda
  • Ice

Method

  1. In a glass, add the sugar, mint, fruit, and lime juice.
  2. Muddle to bruise the mint and dissolve the sugar into the fruit.
  3. Add rum, then top off with club soda and ice.

Saturday, March 21, 2009

blueberry muffin throwdown

What's a blueberry muffin throwdown, you ask. It is inspired by Bobby Flay's show, Throwdown, where he studies someone's signature dish, perfects it, then shows up to challenge them in a competition. I'm taking two blueberry muffin recipes, comparing them side by side, and selecting a winner based on which embodies the spirit, if you will, of a blueberry muffin. And may the best recipe prevail.

A. Blueberry Muffins, from Gourmet Magazine (via Food Network)

I found this recipe earlier in the week from a basic recipe search on Food Network. It was rated with 4 stars and sounded pretty simple. So I went ahead and made it.


3/4 C butter, softened
1/2 C vanilla sugar
1/2 C sugar
3/4 C milk
1 egg
1 3/4 C flour, sifted
2 1/2 tsp baking powder
1/2 tsp salt
1 1/2 C blueberries (I used frozen)
1-2 tbsp flour (reserved for the blueberries)

  1. Preheat the oven to 400. Grease or line a muffin tin; set aside.
  2. Cream the butter and sugar until fluffy. Add in the egg, mixing well, then slowly add in the milk. Blend completely.
  3. In a separate bowl, mix together the flour, baking powder, and salt. Add to the butter mixture until just blended.
  4. Toss the blueberries with flour to coat, then fold into the muffin batter.
  5. Fill the muffin tin to nearly the top nearly to the top. Bake muffins for 20 minutes, or until an inserted toothpick comes out clean. Turn onto a rack to cool.
I found this recipe (as originally written) a real hassle, so I revised it a tiny bit to be less fussy (and added my own spin with the vanilla sugar and more blueberries!). Blending the milk into the butter/sugar was a soupy nightmare, I'm surprised the muffins even turned out as muffins.

The end result, though, is a very sweet, almost cake-like muffin that I thought was a bit sparse in terms of the blueberries. I really like a lot of blueberry in my muffins, otherwise what's the point of a blueberry muffin? The muffins also fall apart easily which make them a bit hard to eat.


B. Double Blueberry Muffins, from Gale Gand (via Food Network)

I've had this recipe in my arsenal for a few years now. Always super simple, always delicious. Like the above recipe, it is also rated with 4 stars on Food Network.


1/2 C butter, softened
1 C sugar
2 eggs
1 tsp vanilla
2 tsp baking powder
1/4 tsp salt
2 1/2 C blueberries (I used frozen)
2 C flour
1/2 C milk
1-2 tbsp flour, reserved for blueberries
1 tbsp sugar, reserved for muffin tops

  1. Preheat oven to 350. Grease or line a muffin tin, set aside.
  2. Cream butter and sugar until fluffy. Add eggs, one at a time, then vanilla, baking powder, and salt.
  3. Mash 3/4 C of the blueberries and blend into the batter.
  4. Add 1 C of the flour, mix well, then add 1/4 C of the milk and mix well. Repeat and mix until just blended.
  5. Toss the blueberries with flour to coat, then fold gently into the muffin batter.
  6. Fill the muffin tin with batter, then sprinkle muffin tops with the sugar.
  7. Bake for 20 minutes, or until an inserted toothpick comes out clean. Let muffins cool in the tin for 20-30 minutes, then turn out onto a rack to cool.
These muffins have a nice blueberry flavor throughout and a nice texture. I enjoy mine as a nice mid-morning snack with tea.


And the winner is...


B! I prefer this more traditional blueberry muffin for its texture, taste, and appearance. Not to mention it is really easy to make. If I were big on muffins, I'd probably use this recipe as a nice base to experiment with.

Thursday, March 19, 2009

Chapati with Coconut-Peanut Butter

I originally saw these flatbreads on Guy's Big Bite, then again in another cookbook and decided to give them a whirl. I love 'em because they are super easy to make and would go well with a lot of different flavors. I also make mine entirely with whole wheat flour. Yes, it may sound a bit scary, but I think it works. Feel free to stick to the "real" recipe and use regular flour.

Chapatis

Ingredients

  • 1 1/2 cups whole wheat flour
  • 1 tsp salt
  • 1 cup water

Method

  1. Combine flour and salt in a bowl, then stir in water until a stiff dough forms. Let rest for 20 minutes.
  2. Preheat a skillet over medium to medium high heat.
  3. On a floured surface, take small bits of dough (a bit larger than golf ball size) and roll out to 1/4 inch rounds.
  4. Cook the rounds for 30 to 60 seconds per side. Be careful not to overcook!
  5. Serve warm with your choice of toppings (see my favorite below), or plain if you like.


Coconut Peanut Butter

Ingredients

  • 1 tbsp peanut butter
  • 1 tbsp coconut milk

Method

  1. Combine ingredients well.

Wednesday, March 4, 2009

hope you're hungry!

Mmm...Thai food!

Dracula's Nightmare--

Pla Rad Prik--


Thailand Restaurant
http://www.yelp.com/biz/thailand-restaurant-beaverton

Sunday, March 1, 2009

try something new!

Last weekend I went out on a culinary limb and made a brussel sprout salad, inspired by this recipe from 101 Cookbooks. I have never really been a fan of brussel sprouts (though I do like them roasted and tossed with salty pancetta and balsamic vinegar), but I admit, these looked like they could be a winner.

I shredded the brussel sprouts and tossed them with a lemon vinaigrette similar to Heidi's. It made for a perfect light lunch paired with leftover roast chicken and bell pepper sticks.


With the said roast chicken, I also made chicken stock from the carcass. Very Martha Stewart of me, I know. But oh, wow, is that stuff good.

Chicken Stock

1 chicken carcass
1 onion, quartered
1 carrot, roughly chopped
zest of one orange
couple sprigs thyme
8 cups water

Place all ingredients in a large pot over medium high heat until boiling. Reduce heat to a simmer and cover slightly. Cook for up to 4 hours, adding more water as necessary. Strain and refrigerate until ready to use.

My stock gelatinized, so you may want to heat before using.


A couple of days ago, I made a nice tofu and spinach soup with my stock--so good! To make, bring the stock to a boil, add a handful of spinach, and season with salt and pepper to taste. Cook until spinach is wilted. While this is cooking, cube some silken tofu and place into a soup bowl. Pour stock/spinach over tofu and serve.

Wednesday, January 28, 2009

yellow dal

I mentioned homemade chicken stock yesterday--I decided to make yellow dal with it. I found this recipe in the foodday section of the newspaper while browsing through the recipes. It also happens that I bought yellow split beans at an Asian grocery store this weekend.

I have absolutely no experience with Indian cooking so I didn't know what to expect. The recipe was really easy to make, though, and tasted pretty good. Unfortunately, I forgot to add salt when cooking but it's a fairly easily remedied mistake. Here's my lunch, served over brown rice--


Yellow Dal

the peas:
1 C yellow split peas
1/2 bay leaf
1/4 tsp tumeric
3 cups chicken stock (obviously not vegetarian, but I don't mind)
Salt
  1. Rinse the peas extremely well with running water in a sieve. Water should run clear. Add the peas to a pot with the other ingredients. Bring to a boil, stirring occasionally, then reduce to a simmer for 20-30 minutes until tender. Season with salt.
the tadka:
1/4 C vegetable oil (or ghee)
1 tsp cumin seeds
1 C thinly sliced onion
1/2 tsp crushed red pepper flakes
  1. In a pan, heat the oil over medium high to high heat. Add cumin seeds and fry for 10 seconds, then add the onion. Cook the onion over medium heat for 12 minutes until golden brown. Add in the crushed red pepper flakes and cook for another 2 minutes or so.
  2. Serve the tadka over the top of the dal.

Tuesday, January 27, 2009

Semolina-Citrus Turbinados

The best way to spend a Sunday? In the kitchen of course! A friend and I made these wonderful cupcakes, along with citrus turbinado sugar cookies and chicken stock of all things. Sadly I don't have the recipe for the cupcakes myself. But the general idea is steeping the milk in earl grey tea. We whipped up a quick lemon cream cheese frosting to finish.


I recently spotted a natural sweetener cookbook--Sweet!--at the library on the new arrivals wall and instantly grabbed it. The gorgeous cover photograph really sealed the deal. When I did take a look inside, I had to buy it. The Semolina-Citrus Turbinados are the second recipe I've tried from it and I haven't been disappointed.

Semolina-Citrus Turbinados from Sweet!

1 C turbinado sugar (Sugar in the Raw brand is everywhere)
zest of 1 orange
1 C flour
3/4 C semolina flour
1/4 tsp baking powder
1/2 tsp salt
1 1/2 sticks unsalted butter, cold and cubed
2 tbsp lemon juice
1 egg

In a food processor, pulse the sugar and orange zest. Add flours, baking powder, and salt and pulse until blended. Add the cold butter and pulse until you have a bread crumb like texture. In a separate bowl, whisk the egg and lemon juice; add to the food processor, running the machine until the dough forms a ball.

Knead the dough a bit, divide, and form into two 1 1/2" logs. Refrigerate for 2 hours.

Preheat the oven to 350. Slice the dough into 1/4" rounds and place onto a nonstick cookie sheet. Be sure to leave enough room for the cookies to spread a bit. Bake for 12-14 minutes. Keep an eye on them because the sugar may burn quickly. Transfer to a rack to cool. After cooling, spread icing on top of cookies, if desired.

To make the icing:

2 oz cream cheese at room temp
2 tbsp orange juice
1 1/2 C powdered sugar
orange zest, if desired

Whisk the cream cheese and orange juice (and orange zest, if using) until smooth. Add in the powdered sugar and mix well.


Tuesday, January 13, 2009

Double Chocolate Espresso Cookies

I can't resist cookies. And these ones are pretty fantastic.

Espresso Cookies

Bob's Red Mill Sourdough Muffins

Honestly, I bought the Bob's Red Mill Baking Book on a whim at Powell's. Considering it was on sale for half the original price, I'd say it was a pretty good deal. The book is filled with all kinds of recipes using all kinds of grains.

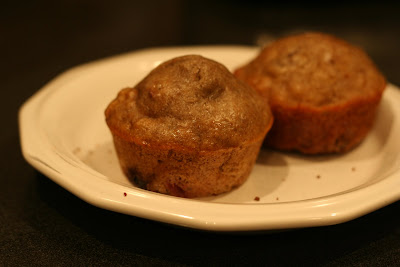
I really like this recipe, especially with a sourdough starter sitting in the fridge. The best part trying different additions, like dried fruit or grated cheese. Just be sure to add it to the dry ingredient blend. I made two variations in one batch--white cheddar and provolone, and a dried blueberry/cranberry combination (the recipe recommends 1 3/4 cups of cheese for one batch, or 1 1/4 cups dried fruit).


Sourdough Muffins
from Bob's Red Mill Baking Book

1 3/4 C whole wheat flour
1 C all purpose flour
1 tsp baking soda
1 tsp salt
1/4 C sugar
1/2 C sourdough starter
1 1/2 cups warm milk
2 eggs, beaten
1/4 C vegetable oil
  1. Mix dry ingredients together in a bowl. In a separate bowl, mix together the wet ingredients. Pour the wet ingredients into the dry and stir to moisten (this doesn't need to be well incorporated at all).
  2. Cover with a lint-free dish towel and sit out at room temperature for 12 hours.
  3. When ready to bake, preheat the oven to 400 and spray a muffin tin. Stir batter to combine, pour into muffin tin, and bake for approximately 20 minutes.